Showing posts with label Free knitting pattern. Show all posts

Wednesday, December 2, 2009

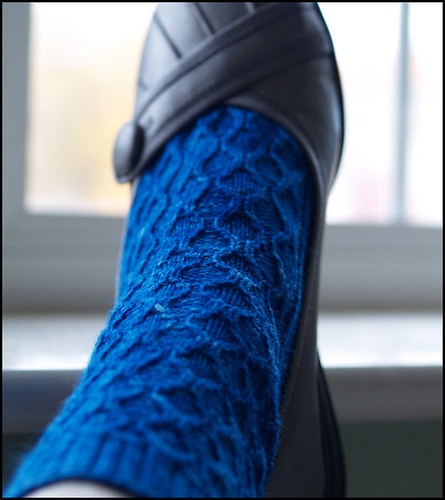
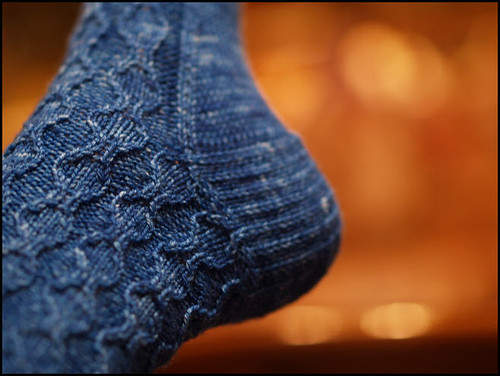
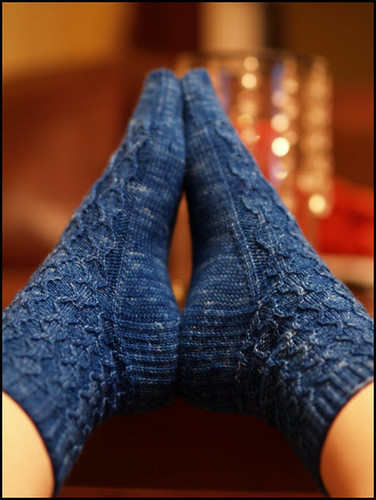
Sinuosity Socks ..now available

The Sinuosity Sock pattern is finally complete. I decided to make it available in multiple sizes which required a little more test knitting than I had planned.


$5.50
Gauge:
Light Fingering - 8 sts and 12 rows = 1 inch

Sizes: S, M, L

S - 7" foot and leg circumference
M - 8" foot and leg circumference
L - 9" foot and leg circumference

Socks will stretch 1 - 1.5 inches to accommodate a larger foot and leg. If you have a larger instep be sure to go with the longer heel flap so your socks fit properly.

Shown in size M. Model wears a US size 8.5 - 9 shoe, medium width.

Materials:
US size 1 (2.25mm) double pointed needles

Yarn -1 hank Destination Yarn (America the Beautiful Collection - color Sea) - Jeanne dyed up some of the Sea color so head over and get yours before it's gone.

Tapestry needle

Click the buy now button to purchase and download a pdf version of the pattern. Please note if you are using your checking account to make your purchase you will receive the pattern once the payment has been processed. If you don't have a paypal account that's OK you can make a purchase without an account by using a major credit card. If you are a Ravelry user you can also purchase it through my pattern store.

Every attempt has been made to produce a high quality pattern, free of errors.

Enjoy!!!

Monday, February 18, 2008

Night on the Town Bag

I needed a small bag to take with me to a wedding. Nothing too big but big enough to hold my id, lipstick, powder, money etc... You could make this bag with a variety of different yarns. You don't have to use sequins if your not a flashy girl. Plain Berroco Suede makes a really cute bag. You could also change out the handles to get a different look. If you make this pattern please send me pictures.

Materials: I used approximately 60—80 yards.

Sequin & Suede Version:
US size 9 straight needles
1 Berroco Mirror FX (Color 9004)
1 Berroco Suede Deluxe (Color 3999)

Variegated Purple Bag:
US Size 10 straight needles
2 Plymouth Magnum (Color 2110)

1 Yarn needle
1 Pair of handles—Handles shown can be beaded if desired.
Stitch holder.

Abbreviations:
K - Knit K2tog KFB- Knit in the front and back
P –Purl
RS –Right Side
SSK - Slip slip knit
WS-Wrong Side

Stitch How To:
KFB - knit into the front and back of the same stitch (1 stitch increased)
SSK -slip 2 stitches knitwise one at a time, insert left needle into both stitches and knit together (1 stitch decreased)
K2tog –Insert needle into next two stitches and knit them together. (1 stitch decreased)

Please Note: If you are making the sequin and suede version hold both yarns doubled throughout.

(Make 2, 1 for the front and 1 for the back of the bag)

Cast on 11 stitches.
Row 1: Purl row.
Row 2: *K1, KFB*, repeat from * to * 5 times, K1. (16 stitches)
Row 3: Purl row.
Row 4: *K1, KFB*, repeat from * to * 7 times. (24 stitches)
Row 5: Purl Row.
Row 6: *K1,KFB*, epeat from * to * 11 times. (36 stitches)
Row 7: Purl Row.
Row 8: *K5, KFB*, repeat from * to * 5 times. (42 stitches)
Row 9: Purl row.
Row 10: Knit row.
Row 11: Purl row.
Row 12: Knit row.
Row 13: Purl row.
Row 14: Knit row.
Row 15: Purl row.
Row 16: *K5, K2tog*, repeat from * to * 5 times. (36 stitches)
Row 17: Purl row.
Row 18: Knit row.
Row 19: Purl row.
Row 20: *K1, K2tog*, repeat from * to * 11 times. (24 stitches)
Row 21: Purl Row.
Row 22: Knit row.
Row 23: Purl row.
Row 24: Knit row.
Row 25: Purl row.
Row 26: K1, K2tog, K5, bind off 8, K4, K2tog, K1. (14 stitches)
Tie a scrap of yarn or place a marker at each end of this row.

Working on the first 7 stitches only.
Row 27: Purl 7, place remaining stitches on stitch holder.
Row 28: SSK, K3, K2tog. (5 stitches)
Row 29: Purl 5.
Row 30: SSK, K1, K2tog. (3 stitches)
Row 31: Purl row.
Row 32: Knit row.
Row 33: Purl row.
Row 34: Bind off.

Place remaining 7 stitches on holder back on needle and repeat rows 27-34.

Finishing:
Place front and back together with right sides facing. Whip stitch front and back together beginning at row 26 marker. The top of the bag will be used to attach the handles.

Handles: If you plan on beading your handles do so first before sewing the handles on the bag. You will not be able to bead them after they are sewn on.

Front: To attach the handles fold the top of each side over the handle and whip stitch it down. Repeat this for the back of the bag.

Lining your bag: Lay out your fabric. I folded mine in half with the fold at the bottom of the bag. Lay your bag on top of the fabric. Cut the fabric an inch and a half bigger than your bag following the shape of the bag. Sew the sides together or if you don’t like to sew use Therm O Web to fuse the sides of the bag together. Once that is complete fold over the top of the lining and with a needle and thread attach your lining to the inside of your bag. If you desire you may also sew in a small snap to help keep your bag closed.

Your bag is now ready for a Night on the Town.

Wednesday, November 21, 2007

Christmas Knits Continued

This is a pattern that I came up with last year. The cabled purse was a big thing last year and knitted and crocheted bags are still every where this year. This is a really quick knit. They are good for ladies of almost any age. Every year there is always an unexpected guest that shows up and I panic because I like to give everyone a little something. This was my answer. I knit a couple extra of these each year and if any unexpected ladies show up, I have a handmade gift for them. I hope you enjoy the pattern. Let me know if you have any questions.


Bag:

Cast on 50 stitches.

Row 1:(WS) K3, P2, *K3, P6, K3, P2*,
Repeat from * to * 2 times to the last

3 stitches, K3.

Row 2:(RS) P3, K2, *P3, K6, P3, K2*,
Repeat from * to * 2 times to the last

3 stitches, P3.

Row 3: Repeat row 1.

Row 4: Repeat row 2.

Row 5: Repeat row 1.

Row 6: P3, K2, *P3, C6B, P3, K2*, Repeat
from * to * 2 times to the last 3 stitches, P3.

Row 7 – 36: Repeat rows 1 – 6 five more times.

Row 37: Repeat row 1.

Row 38: Repeat row 2.

Row 39: Bind off in pattern.

Finishing Bag:

1.
Attach the first handle by whip stitching around the handle through the cast on row.
Please Note: Do not whip stitch first 3 or last 3 stitches to handles.

2. Attach the second handle by whip stitching around the handle through the bind off row.

Please Note: You can line your bag before seaming up the sides or after. This is personal preference only.

3. Fold bag in half and seam up the sides.

4. Line your bag and attach a magnetic or Velcro closure.

5. Cut your ribbon approximately 46 inches long.

Tip: You may want to add fray check to the ends of your ribbon to keep it looking nice.

Weave ribbon behind the K2 stitches on either side of the cable and tie a bow. (You can refer to the picture of the bag for proper placement.)

Copyright 2006, Knittingnonstop. This pattern and pictures are the property of Knittingnonstop. All rights reserved. Pattern is shared for individual personal use only. No commercial reproduction of this bag is allowed without prior written permission.

Thursday, October 11, 2007

Noro Winter Hat

I know that it is not winter yet and no one wants to think of snow. I don't either but, I do need to start thinking about Christmas knits. Every year I swear that I am not going to be up the night before Christmas knitting nonstop to finish gifts. This year I was trying to come up with some quick fun knits that don't require a lot of thinking or a lot of time. So, I came up with this pattern. It is instant gratification and I was able to get two hats from one hank.


Materials:

1 - hank Noro Kochoran

1 - pair doubled pointed needles size 10 ½ (or size needed to obtain gauge)

1 - yarn needle

Gauge: 10 stitches and 16 rows = 4 inches

Please note: You can knit this pattern in two styles. For the beanie style follow the first set of numbers. For the turned up brim style follow the numbers in parentheses. One hank will make two hats (one beanie style and one turned up brim style).

Pattern

Cast on 64 stitches.
Row 1: Join in the round being careful not to twist any stitches. K2, P2 to end of row.
(Repeat this row until the ribbing measures 2 (2 ½) inches.)

Row 2: Knit row. Repeat this row until hat measures 5 (8) inches from bottom of hat.

Decrease Rows

Row 1: * K7, K2tog *, repeat from * to * 7 times, K1 (57 stitches)

Row 2: * K6, K2tog *, repeat from * to * 7 times, K1 (50 stitches)

Row 3: * K5, K2tog *, repeat from * to * 7 times, K1 (43 stitches)

Row 4: * K4, K2tog *, repeat from * to * 7 times, K1 (36 stitches)

Row 5: * K3, K2tog *, repeat from * to * 7 times, K1 (29 stitches)

Row 6: * K2, K2tog *, repeat from * to * 7 times, K1 (22 stitches)

Row 7: * K1, K2tog *, repeat from * to * 7 times, K1 (15 stitches)

Row 8: * K2tog * , repeat from * to * 7 times, K1 (8 stitches)

Finishing

Cut yarn leaving a tail about 8 inches long. Thread your yarn needle with this tail and weave through the last 8 stitches. Pull tight ensuring that you do not have a hole at the top of the hat. Secure yarn and weave in ends on inside of hat.

Copyright 2007, KnittingNonstop. This pattern and pictures are the property of KnittingNonstop. All right reserved. Pattern is shared for individual personal use only.